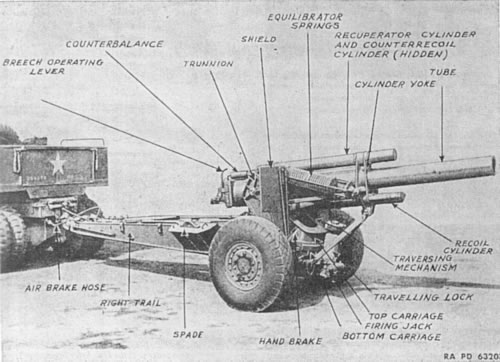
Overview of the Model and References
Technically
speaking, Italeri's kit is not a "gun" as it claims. It
is a howitzer (this is quite curious, as the original Peerless Max
kit #07362-6 was labelled "155 Howitzer M1-A2"). The 155mm
gun is the larger artillery piece also known as the "Long Tom,"
which AFV Club offers in model form. Konrad Schreier's book offers
the following U.S. Army field artillery definitions:
GUN:
A long barrel cannon which normally fires with a flat trajectory,
can fire with a high trajectory, and has a longer range than either
a howitzer or mortar of the same caliber.
HOWITZER:
A cannon with a medium-length barrel which normally fires with
a high trajectory, can fire with a flat trajectory, and has a
shorter range than a gun and a longer range than a mortar of the
same caliber.
The
WWII howitzers featured the M1 and M1A1 carriages. The Italeri kit,
while claiming to be an M1A2 introduced in 1944, is essentially
a post-World War II howitzer because of the screw jack found on
the M1A2 carriages and tread pattern of the tires. If you're building
a Korean or Vietnam piece you'll save yourself a fair bit of work.
But the kit has numerous errors, omissions and simplifications that
span the eras. Included is a radio, which the directions state was
mounted on the trails during transit. I could find no mention of
this radio in the 1943 technical manual.
Kurt
Laughlin pointed out to me that, based on his measurements of an
actual howitzer, the kit's relative scale varies from 1/31 to 1/36,
depending on the particular part.
Well,
no kit is perfect. My approach is to correct the most obvious problems
and add the maximum amount of detail while losing the least amount
of what little hair I have left. Life is short, and I have many
models to build before I sleep! But you never realize the shortcuts
taken by model manufacturers — either by intention, negligence
or production constraints — until you compare a kit to the
weapon's technical manual.
I was
fortunate in obtaining photos of two museum howitzers from Michael
Powell and Kurt Laughlin, which they have graciously allowed to
be included on this site. Kurt also provided a copy of the technical
manual and updates, a wealth of data on the howitzer's ammunition,
and a couple Army diagrams of prescribed emplacements to aid in
my development of the diorama.
As
I mentioned previously, the Schreier book was a helpful introduction
for this project. It has a number of photos of the 155 and ammunition
from the howitzer's technical manual. The book also features a good
explanation of artillery fire control and direction as well as ammo
development for a number of tanks and field pieces. There are a
number of other good web sites where photos of 155s, in Vietnam
and Korea as well as from WWII; just enter "155 howitzer"
or "155mm howitzer" into a search engine. Most general
books on WWII will have a photo or two of this gun in use as well.
One
thing I like about the old Testors releases of the Italeri kits
is that their directions are a little more comprehensible. For beginning
modelers, they also have a decent introduction to painting and weathering.
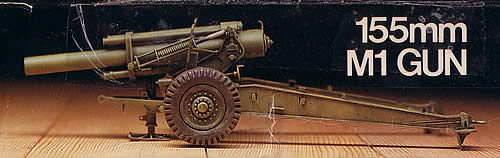
The Testors' boxes typically had detailed color photos of the built
up kit. I'll use their photos of a model by Steve Trompeter in the
construction sections of this article to help demonstrate the significant
changes that I made.
Introduction
Background
on the 155mm Howitzer
Overview
of the Model and References
Building
the Howitzer Assembly
Building the
Carriage Assembly
Painting and
Accessories
Pictures
from the Technical Manual
155mm
Ammunition
Pictures
of Museum 155mm Howitzer
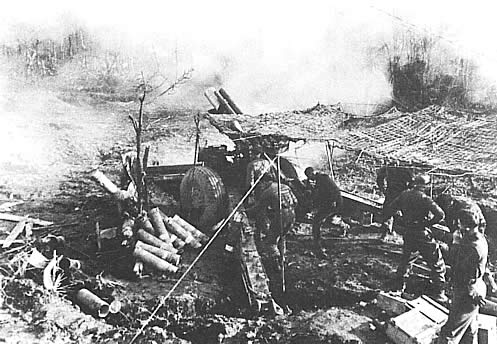
Diorama:
"Mail Call for the Sons of Thor"
|