|
U.S.
Armored Infantry |
 |
|
Dragon
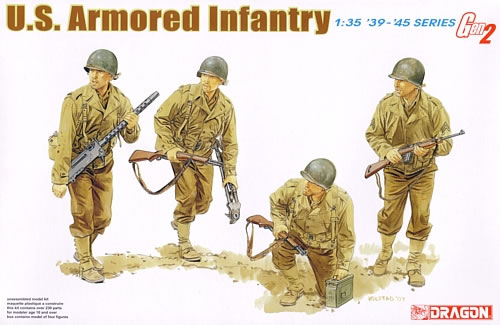
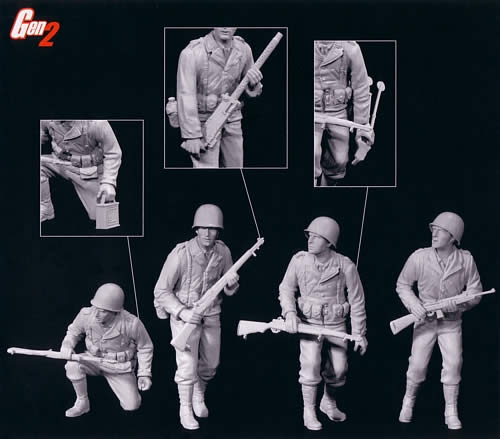
Models Limited Close on the heels of their release of the M2/M2A1 half-track came this 2007 set of figures, which were featured in the vehicle box art (sometimes the manufacturers give you a clue about what's coming, sometimes they don't!). As part of the Gen2 series, the figures have some simple multi-pose capabilities and the oft-trumpeted slide mold weapons with bored-out muzzles. And you get numerous extras from the machine gun sprue of the half-track kit. The GIs are dressed in common garb for the late 1942 to 1944 time frame: the second pattern OD field jacket with the shoulder loops and flapless slant pockets, light shade OD wool serge trousers, canvas leggings, and combat shoes. As such, they'll work in North Africa, Italy, or Northern Europe. The quality of DML's sculpting is really pushing into a realm once reserved for high-priced resin figures, but you need to do some additional work to achieve that quality. The shoulder loops, for example, are separate parts, as are the collars and lower hems of the jackets. The fittings on the leggings are finely detailed, and with the boots they form separate pieces to attach to the bottom of each soldier's leg (nice if you have some late war figures with the leather gaiters that you want to adapt for earlier settings). Each torso is molded in two front and back halves, rather than the one solid chest that has long been the norm, and they have nice detailing and folds in the cloth. Even the faces are more defined, though I'm not wild about the odd two-part heads. As always, there a numerous sources for replacement noggins.
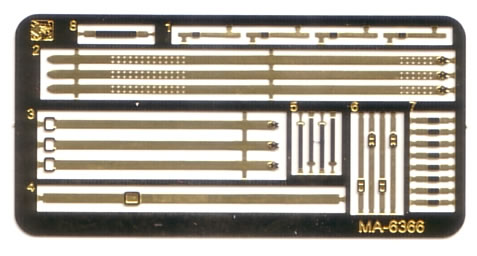
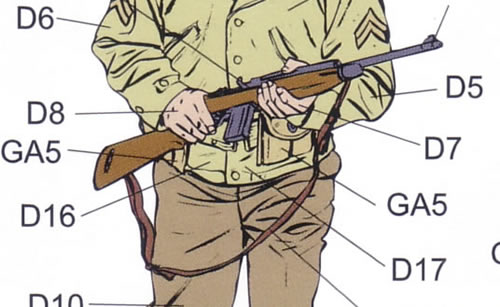
The multi-pose approach yields modest changes for the three machine gun crewmen: you can swap the gunner's .30 Browning for an M1 Garand. The separate hands designed to carry the ammo box and tripod have empty-handed alternatives (though the tripod carrier looks a bit stiff without the weight of the tripod pulling his left shoulder down). Fortunately, DML figures have always been rather easy to swap upper and lower body halves and you can probably get a little more mileage out of these figures by combining them with other sets with a minimum of alterations. The personal gear is is appropriately limited to what armored troops would take into combat: weapons, ammo, and water. If you have them on hand, you could slap some musette bags or cargo packs and entrenching tools on them if your want to make them leg infantry. The Gen2 weapons set is nicely detailed, but the separate bolt mechanisms are a bit fiddly for my taste, and I'm not sure what to do with all of those clips of ammo. But the machine gun sprue holds a nice bonus: a .50 and two .30 guns, two pair of two types of cradles, early slanted .50 ammo boxes, pioneer tools (without straps) and the SCR-508/608 and SCR-510/610 radios. The spares box will be happy! Another feature of the Gen2 sets is the addition of photoetch. This kit offers straps for both the M1 helmet and the liner presumed underneath the steel pot. The remaining straps are devoted to the weapon slings. As such, they are a little tricky to piece together with only the DML illustrations to rely on.
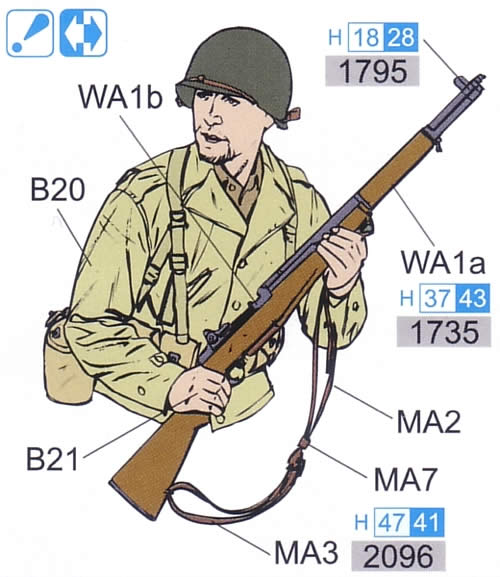
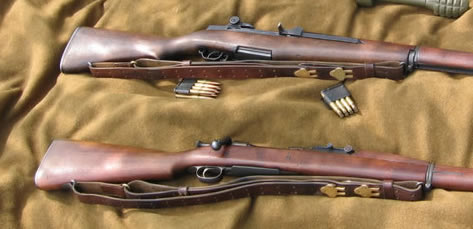
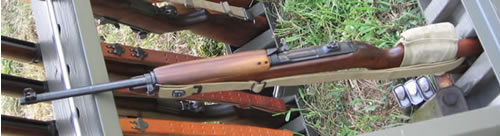
You have three PE pieces to work with for the Garand slings (MA2, MA3, and MA7). Looking at the larger inset image of the MG gunner as equipped with the Garand. What they show is a simplified approach that may not be 100% accurate for the leather belt DML is portraying; it appears more like the 1944 web sling.
The longest section of the sling, MA2, has perforations at the two ends. These would be hooked by the "cloverleaf"-shaped metal clasps on the right end of MA2, and the right end of MA3. If you examine the actual Garands above, you can follow the flow of the straps. MA2 goes through the buckle on MA3. Both MA2 and MA3 loop back onto themselves. But the way DML has portrayed this, the ends just loop back onto the two individual straps, like an elongated figure 8. Piece MA7 is a loop that helps keep the forward end part of the strap in place, just like the little loop on the belt you wear on your pants. In real life, the straps go through fittings on the bottom of the butt and forward stock. As portrayed on the kit's Garands, the fittings are solid, so you either glue the ends of the outer loops of the photoetched straps onto the outside of the fittings, or carve them off and just glue the straps directly to the underside of the rifle. The other option, which I've used in the past with homemade slings, is to wrap a thin wire around the straps at that point and glue them to the rifle. The web strap for the carbine is simpler. Just loop the left end over to the buckle. There is a small loop at the forward end that attaches to the front of the gun.
Sometimes greater accuracy comes with greater complexity—remember back in the early 1990s when everyone was clamoring for indy links? But DML is to be commended for pushing the envelope with their Gen2 sets and giving more features to more demanding modelers. This is a very worthwhile and versatile addition to the expanding GI figure products. -tss |
 |
 |
 |
 |
 |
 |
 |
 |
 |
 |
 |
 |
|