|
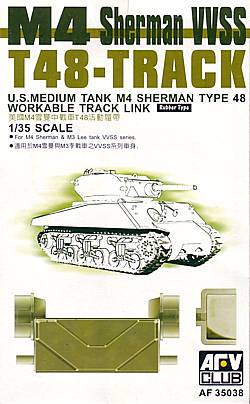
M4
Sherman VVSS T48 Track
|
 |
|
The T48 track featured the distinctive rubber chevron that is sometimes confused with the T54E1 that had a narrower steel chevron (standard in Tamiya Sherman kits). The chevrons helped improve cross-country traction over the earlier plain-faced T41 and T51 rubber blocks. AFV Club's set is notable for its inclusion of duckbill end connectors, which were designed to give the tank greater "floatation" and disperse the vehicle's ground pressure. Unfortunately, there are not enough duckbills for a full run of track. In reality, these often broke off from the track through use and abuse. But if you want to represent a complete run, you'll need to buy a second set of tracks. I've built both this set and the T51 tracks, and I offer this word of caution: not all drive sprockets are created equal. Meaning, the track as completed may not sit properly on the particular vehicle you're building. It's best to put together a run of 10 to 15 links to make sure they will situate themselves between the spokes of the sprocket. If you have problems, you will either need to resort to an alternative sprocket or different tracks. Assembly is pretty simple, if tedious. There are ejector pin marks on the flat side of the tracks that need some scraping. I do this while the parts are still on the sprue to make them easier to handle. You may need to clean up the tracks some more after they are removed from the sprue. Some people use jigs to keep the tracks in place while attaching the end connectors. I prefer to just assemble them freehand, about 10 at a time. The connectors fit on the pins with only an occasional end connector needing to be opened more to accept a pin. While ostensibly "workable," there is not much of a friction fit so the links easily fall apart. A simple solution is to place a dab of white glue onto each pin (or dip the pins into a small puddle of glue). The glue gives enough adhesion to keep the track together; even after drying, they can be worked around the suspension with some care. Because they are glued to the center of the small end connectors, the duckbills should be installed after the track is in place on the suspension, since you will invariably get some model glue onto the pins and "weld" them in place. You don't want to use white glue on these since you won't have the secure bond you need to keep the duckbills from popping off. Paint and weather them as you would rubber band tracks. Indy links were borne out of one of those "be care of what you wish for" situations, when they were at the top of modelers' lists of wants in the last decades of the previous century. When Dragon started producing kits with nothing but 400+ piece tracks, the novelty quickly wore off. They still make sense on German and Soviet tanks, with their distinctive sagging tracks. But on U.S.-made tanks, there was no sag and indy links should not vary much in overall look from rubber band tracks found in Tamiya, Academy, or AFV Club kits. To really show these indy link tracks off best, one needs articulated suspensions, such as those on Shermans from Tasca or, to a more limited extent, Italeri. Or, if you want to display a tank that has thrown its track or has been damaged. But if you want to go this route, these tracks from AFV Club are easier to assemble than Dragon's (which have shorter pins) and considerably less expensive than Model Kasten or Friulmodelissimo. And they'll provide hours of mindless activity while listening to a ball game or your favorite war film. -tss |
 AFV
Club
AFV
Club |
 |
 |
 |
 |
 |
 |
 |
 |
 |
 |
 |
|